|
|
|
Return To Gallery Menu
|
| |
|
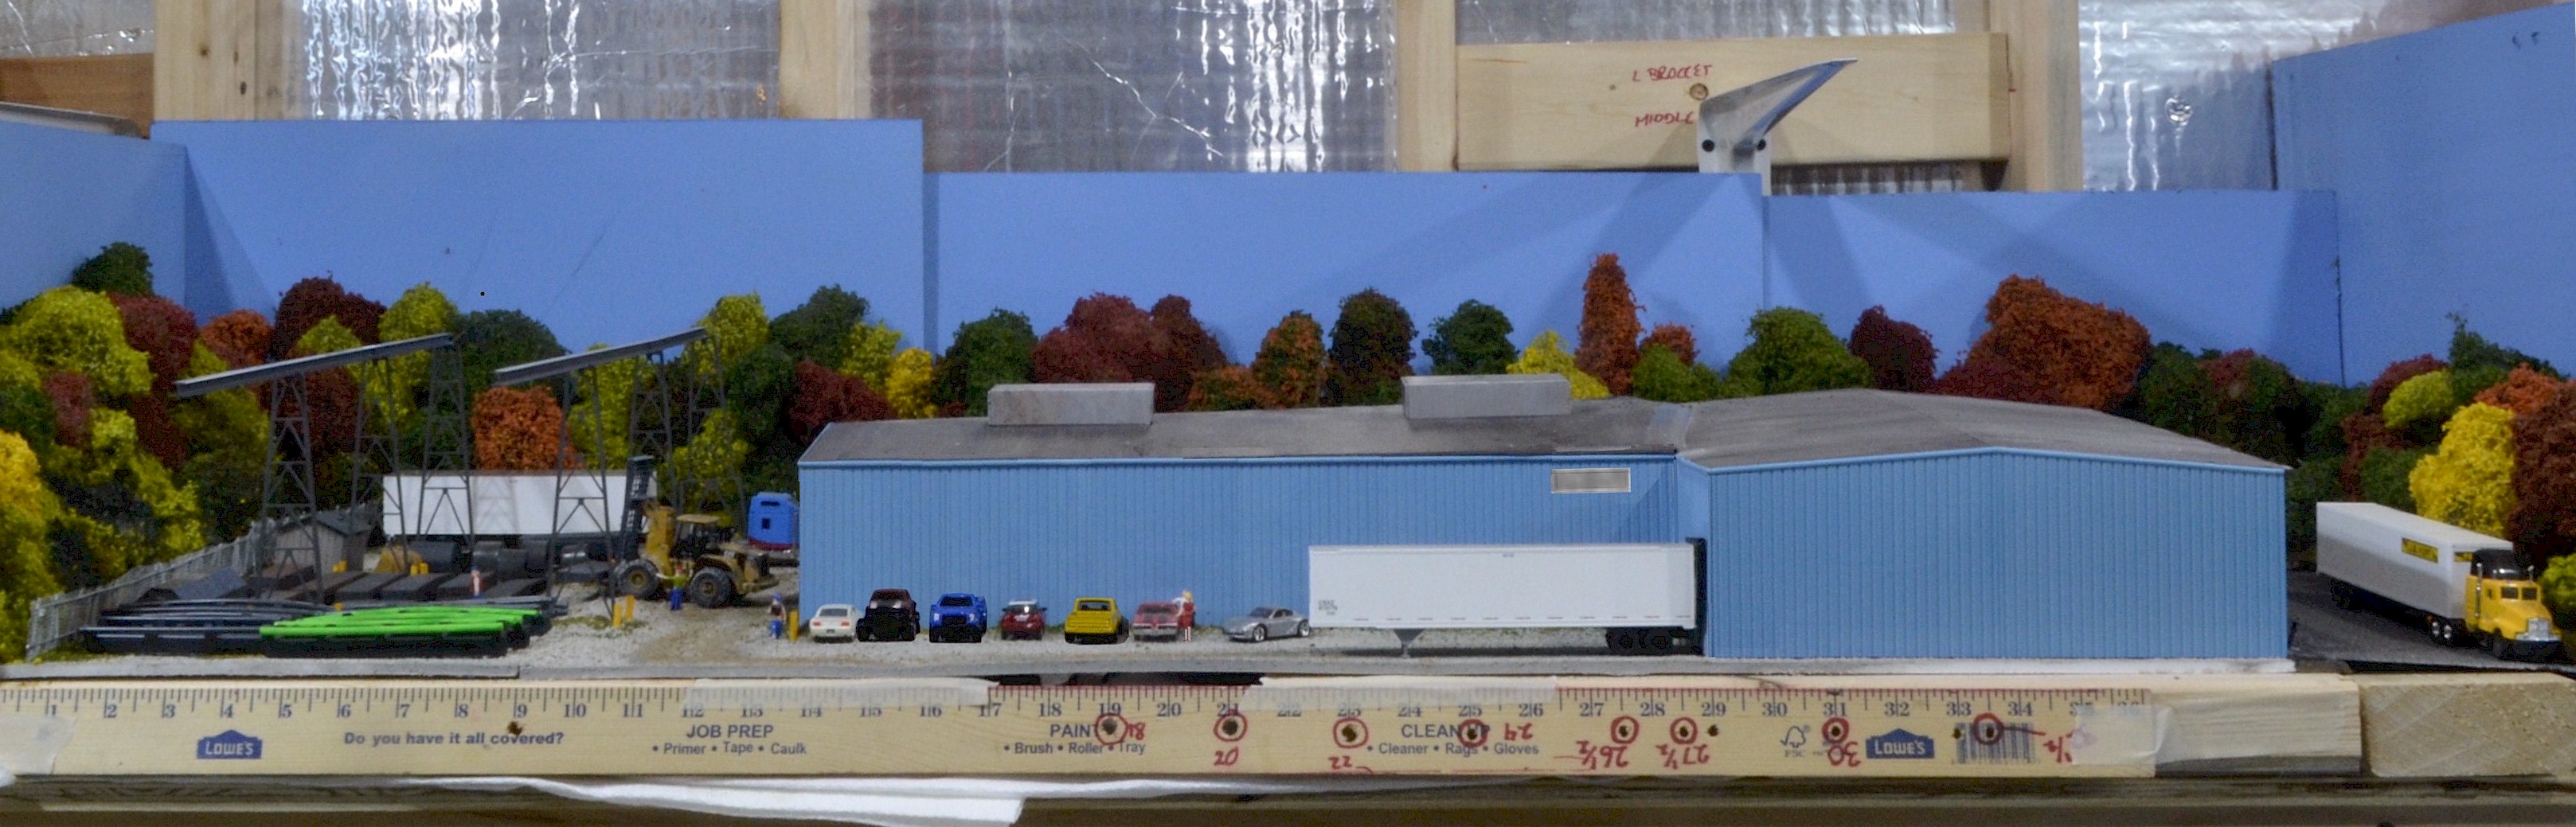
Diarama For Clermont Steel
|
|
This is the raw photo of the diarama created for the backdrop for Clermont Steel. This was the first diarama completed to test my concept of using modeled scenes to create photo backdrops.
The thought behind the concept was if I used the same modeling techniques and materials used on the layout to create a diarama of what the background would look like if it were actually modeled, then took a picture of the diarama from an angle close to what the scene is typically viewed from, that I'd end up with a more seamless transition between foreground and background.
I'll take the time in this post to point out some things I did for this diarama.
1. Building Held Together With Tape and Supported By 2x4 Scraps
The building is a Pikestuff engine house kit. For those familiar with Pikestuff modles, you know each individual section is separate. I took advanatage of this to size the building. The real Clermont Steel has roughly a "T" shape. There is a relatively small building that runs parallel to Old State Rout 32 and faces predominately North. The peak of this building is on the sides. That fron building is represented by the peaked building with the truck trailer parked on the back side.
Proportionally, this building is too large on the model. But the inside corner it creates on the backside is accurate.
A gravel road does come along this side of the building. On the prototype, assembled roller coaster sections are stored in the yard. I didn't include a lot of storage in the background, opting instead for parked cars along the building. The parked cars are also accurate for Clermont Steel.
The main building runs perpendicular to the front building already discussed. The model of this building is accurate in orientation, but is much smaller proportionally than in real life. There is also building on the back end that creates another inside corner at the rear that I did not model. I opted instead for more yard space, as the yard storage of materials and work in process items is an important feature the Clermont Steel scene.
The last feature of the building was the color. The actual Clermont Steel is a pretty plain blue color similar to the color the model comes in. So I didn't paint the building. The roof is just cardstock painted black.
The individual sections were taped together. There may have been a piece of styrene that ran along the back, but I’m wriiting this a year after having torn it down, and I don't recall. I do know that I used scrap blocks of 2x4s to provide firm backing to keep the building upright and help support the roof. There is no backside to this building.
2. The Lot
I used foam board as the foundation for the lot. I painted it with the same acrylic paint I use as a base coat for my layout scenery. That was a huge mistake. The gator board warped. And that note was added to the lessons learned column.
To recover from that mistake, I jused more scrap 2x4s as a based. I then used panelling nails to nail the foamboard to the 2x4s. This did a decent (no where near perfect) job of leveling out the yard. I think put a layer of gravel and dirt down. I then added grass to simluare weeds in select spots.
Most of the modeling details are store bought and easy to figure out. There are a half dozen or so figures in the scene, including one guy walking into work at the building corner, A lady in a red dress having a conversation with a guy (mostly blocked out by her) at the red car, and a supervisor instructing the forklift driver how much room he has.
The cars are mostly HO scale models, thought the pickup trucks are Hot Wheels photographed and shrunk to HO scale. The truck trailers are part of my collection of trucks, and will be reused on the layout (as will the cars).
There are a few details in the lot I was particularly happy with, and represent why I wanted to try this… being that I would model details like these the exact same way in the foreground. First, the path the forklifts follow is worn down. I did this by adding a little more dirt and simply rolling the forklift over it. This not only gave the path a different color and texture, it also weathered the wheels on the forklift.
The yellow corner post protecting the building and overhead crane are just short cuts of a small dowel stick. Extremely simple, but the sort of detail that I would model in the forground. As a matter of fact, the there will be a few of these protecting the modeled portion fo the overhead craine with the scene is done.
The roller coaster sections were particularly fun to tackle. I didn't know a darn thing about modeling roller coaster sections. And I couldn't find any for sale. The are simply made by taking a square tube of styrene and two tube pieces of styrene all cut to about six inches. I then used some L girder shaped pieces of styrene to form the risers. All this was glue together, and some were bent to make curves. They were then painted black, with a view having the rails painted green to indicate they are finished.
3. Trees In The Background
Knowing my plans to do multiple scenes like this, I made several trays of trees from scrap styrafoam. Most are abour three to four inches deep and vary in length from six to twenty four inches long. There was no planning to the lengths, it was all based on the pieces of scrap I had.
On each pieces of scrap, I pained it with a latex base and covered with ground foam. I then hot glued the trees in place. This is the same way to model treed spaces on the layout. These sections were then placed around the diarama to complete the backdrop. Scrap pieces of hardboard were painted with the same sky blue used on the layout backdrops. NO attempt was made to conceal the seams, because I know I'd 1) do a lot of photo editing on the picture before printing and b) would cutout most of the backdrop before installation. The backdrop was just added to ensure I didn't accidentally pick up elements from the basement in my background.
4. Sizing Things Up
One of the planning elements I spent the most time on was how am I going to translate my image to hardcopy at the exact right size. I use Microsoft Image Compossar for image editing. It has not been commercially available for twenty years. But it does all of its sizing in pixels and not inches. So I have to do conversions or use other tools. I ultimately used Microsoft Powerpoint to size the image.
The key to sizing up the image was having the yardstick in the picture. I use this yardstick in every diarama for the same purpose, and even include it in the print. The yardstick only comes out of the backdrop when it is time to install. The yardstick must be at the base of the scene where the foreground and background will meet. (Modelers will notice the holes drilled and marked for measuring radius. There is another hole at 1 inch that is taped over that I put a nail thru when measuring).
That a pretty long explanation of how I created this diarama. If you have questions, email me using the Contact Us link on any of the pages.
|
| |
|
Location:
Peavine Division
|
Date: 10/8/2021
|
|
Source:
-David Lamb Personal Collection
| (http://www.dlamb15.com/wo/)
|
|
Photo ID: 2836
|
|
Categories:
Clermont Steel |
|
|
|
|
|
|
|